iSurvey Plugin

Update: The sale for the iSurvey plugin for WordPress is now live at just $10.00 for the first 48 hours or 48 copies, whichever comes first.

This deal will then rise to $27.00.

Buy now

***

The iSurvey plugin is designed to help you list build virally, and yes it’s mobile friendly / responsive.  😉

Demo Page

It enables you to quickly put up simple surveys on your blog so that you can find out what your visitors or customers really want. As well as being able to set up the questions, there are also a ton of options in the admin panel to allow you control over the look and feel of your surveys.

o Select colours, images, borders and other design options
o Optionally upload your own background photos and logos
o Text, textarea, radio and checkbox questions
o All major social sharing buttons at survey completion
o Optional auto URL redirect at survey end
o Fully widgetised – design your own to suit the location
o Add surveys to widgets
o Create multiple widget design with a single survey
o Add widgets to pages and posts as well as sidebars (TinyMCE button)
o Display widgets as popups with optional lightbox effect
o Display different widgets by posts and pages
o Display widgets globally and on the home page
o View individual survey results

There are widget options to enable you to add a widget to a widgetised area if you wish, and you can also add the same widget to pages and posts via a button in the TinyMCE editor.

There’s even a built in popup with an optional lightbox effect.

To support the popup functionality, you can either set global options for the home page and also for every page and post, OR there’s a new admin block in pages and posts to allow you to select the survey popup you want to display to your visitor for that page or post only.

You can create your survey using four essential question types.

#1 – A simple text field for asking for information like name, email address, etc.

#2 – A longer textarea field for more complete information such as “What do you think of…?” types of questions.

#3 – Radio button questions for getting the survey taker to select one of a list.

#4 – Checkbox style questions for asking the user to select all that apply.

And at the end of the survey there’s a full complement of social sharing buttons to help make your survey go viral, or you can optionally auto-redirect them to another URL.

Here’s an example of how you could use it, and make it go viral for you.

You promise to give everyone who completes the survey something you think they want such as a downloadable report or a short video showing them how to do something useful.

When they complete the survey you give them the promised item and tell them that when you have enough people complete the survey, then you’ll give everyone who completed it something even better (you decide what). You then say that to help this happen would they mind sharing the survey using one of the share buttons?

And if your offer is attractive enough, it goes viral. More and more people take the survey and share it and on it goes.

Here’s another example.

If you’re already gathering names and email addresses via paid advertising, then you could even set up a series of surveys as landing pages for your campaigns together with your offer. At the end of the survey you could then either leave the sharing active as described in the previous example, or choose to use the redirect feature to send them to a CPA page or to a product or service you’re promoting.

And one final example.

You could send your existing lists through the surveys you’ve created as part of your autoresponder sequence. You would design each survey to promote interest in the visitor for the type of product you’re promoting. In other words, send them to a survey about list building, and at the end give them a short report about list building with your affiliate links in it, and/or place a link on the final page to take them to the key list building product you’re promoting.

The upshot is, by getting people to fill in short fun surveys you can also make them mentally “change gear” and get them to start thinking about the product you’re promoting at the end of the survey, while also getting valuable information about what it is they want from this kind of product.  😉

Cool eh?

-Frank Haywood

Posted by Frank Haywood in internet business, social marketing, software, wordpress plugins

Magic Landing Pages Plugin

Update: The sale for the Magic Landing Pages plugin for WordPress is now live at just $17.00 for the first 48 hours or 48 copies, whichever comes first.

This deal will soon rise to $27.00.

Buy now

***

[youtube id=”BgT7ABX240Y” width=”640″ height=”360″ autoplay=”no” api_params=”&rel=0&showinfo=0″ class=””]

Demo pages from video:-

Demo Sales Page

Demo Optin Page

It also comes with a bonus plugin too – Magic Styles for WordPress.

I know as well as anyone how difficult it can be to create a sales page using one of the current crop of page builders. Especially when you just want to get something up and running quickly and there’s a million and one settings you have to fiddle with to get the job done.

Magic Landing Pages is designed to help you quickly create sales and optin pages when time is at a premium, and gives you a blank canvas on which you can add your content and build your pages.

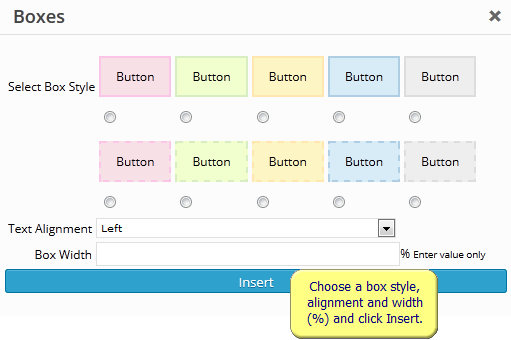
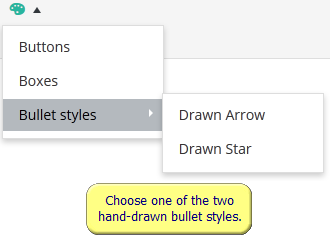
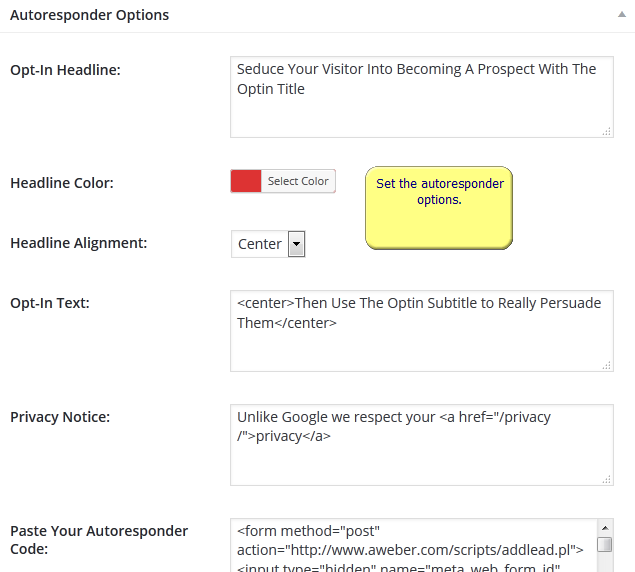
It also adds some additional functionality into the TinyMCE editor, and these are buttons, boxes, hand drawn bullet styles and opt-in form handling.

magic-landing-pages-01


magic-landing-pages-02


magic-landing-pages-03


magic-landing-pages-04


magic-landing-pages-05


magic-landing-pages-06


But better than that…

As part of this sale, I’ve also decided to include the Magic Styles Plugin. This is a perfect complement to Magic Landing Pages and will add a whole slew of functionality to your page designs including 12 extra bullet styles, notice box alerts, additional button styles plus testimonial boxes.

If you then also add the free Google Fonts Manager plugin which will give you the ability to change font styles and sizes across the whole of your site, you’ve got a fast and easy to use solution to putting up landing pages which isn’t going to break the bank.

Today and then for the next 48 hours or 48 copies (whichever comes first) you can get the Magic Landing Page plugin + bonus plugin for just $10.

Why not go check out this post on How To Generate A Google Fonts API Key so you’re ready to install the Google Fonts Manager plugin?


-Frank Haywood

Posted by Frank Haywood in internet business

How To Generate A Google Fonts API Key

There are a number of scripts and WordPress plugins that allow you to use Google Fonts on your web sites. I’m now using Google Fonts Manager on my WordPress sites.

However in order to do so, you need to first generate a Google Fonts API key, and it’s not obvious how to do this.

After figuring it out I decided to run through the process again and take some screenshots and annotate them so that you won’t run into the same head scratching trial and error problems I did.

Good old me. 🙄

Seriously though, if you appreciate what I’ve done or at all like it in any way, then please link to this article from your web site or use the social sharing buttons at the bottom. Your readers will appreciate it as much as I do, and if it’s more easily found then it will save even more people going through the trial and error that I did. Thanks.

The first thing you need to do is go the Google Developers Console and log in using your Google account. If it’s the first time you’ve used it then you may need to agree to some terms and conditions.

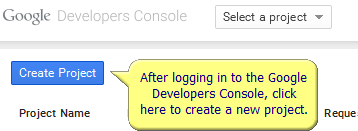
#1 – Assuming you’ve gone through that, then the first thing you need to do is create a new project like this.

google-fonts-api-new-01


#2 – Enter a project name and click the “Create” button.

google-fonts-api-new-02


#3 – You’ll then be taken to the API Project details for the new project you just created. Click on “APIs & auth” to extend the menu list down and then click on the “Credentials” link.

google-fonts-api-new-03


#4 – Next click the “Create new Key” button under the “Public API access” section, and you’ll see a popup overlay to create your new key. There are four options and the one you want to select is the “Browser Key” button.

google-fonts-api-new-05


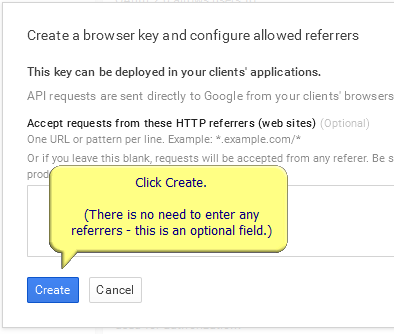
#5 – You’ll now see a window that allows you to generate the actual key (at last). Do NOT fill in the referrers box. This caused me a lot of problems and the key just wouldn’t work, and it only all started working when I left it blank. It actually says it’s optional but then talks about adding them before you go into production. Don’t bother and it will all work fine across all your sites.

Just click the “Create” button.

google-fonts-api-new-06


#6 – Finally, you will see the API key you need to use with your web scripts and WordPress plugins. Hurrah!

google-fonts-api-new-07


I found that the API key doesn’t work immediately, and took nearly 2 hours before the plugin I was using managed to receive authentication access from Google. So go watch a movie or do something else for a couple of hours while you’re waiting for it all to work.

Once it does start working then it will work for all your sites and not just the one you’ve first used it on.

Have fun.


-Frank Haywood

Posted by Frank Haywood in internet business, software, training, wordpress plugins

Amazon S3 Video Plugin

Update: The sale for the S3 Video plugin for WordPress is now live at just $17.00.

Buy now

***

(Did you know you can get a free Amazon AWS account [all Amazon services including S3] for the first 12 months? Just Google it for the details.)

[youtube id=”vvxbHoSo_14″ width=”640″ height=”360″ autoplay=”no” api_params=”&rel=0&showinfo=0″ class=””]

Plugin Great members will find the plugin in the members area.

Demo Page

Why would you want to use Amazon S3 to store your videos?

Many small business owners mistakenly think there are only two options: YouTube, where everything is public and you’re limited to 15 minutes, or self-hosted, where you have total control and a hefty hosting bill to match.

YouTube (YT) is fine for general purpose videos, but there are times when you don’t want YT ads to display on your videos, or maybe you have content tucked inside a membership area that you don’t want people to be able to see or download?

Or you don’t want to be limited to a 15 minute video?

Paid-for content has many times been stolen and has then popped up elsewhere.

I know for a fact that this has happened to a lot of people including me.

Yes, you can mark videos as hidden on YouTube, and if it’s not a course or something particularly sensitive and you don’t mind the ads or the initial 15 minute constraint, then it’s an okay solution to that problem.

Another alternative is to self-host the video of course, but this can work out to be very expensive very quickly if you’re not careful. Sometimes you’re looking at 50c per gigabyte or more as opposed to Amazon’s approximate 14c. (And possible bandwidth caps too.)

You’ll also find yourself – sooner or later – in the position where you want to PROTECT your content and only let your members see it. Maybe for a course or a paid-for newsletter…

That’s why Amazon S3 is a perfect solution to the problem. Amazon have massive amounts of storage capacity and bandwidth and there’s pretty much nothing they can’t handle.

Every file you upload to Amazon S3 is automatically protected.

No-one can download or view unless they have the correct credentials.

What the S3 plugin does is allow access to the videos on a case by case basis. So people can view the videos on your site, but they can’t download them.

This totally sidesteps the issue that I’ve run into in the past where people have signed up to a membership, downloaded all the content and then asked for a refund.

Then I’ve seen my videos etc turning up on someone else’s site.

With the S3 plugin you can protect your sensitive stuff easily and without worrying about it being stolen.

Going back to the first paragraph, the reason I used capitals is because I’ve tried some other S3 plugins and while some are free and don’t work, others are horribly complicated and paid for.

I strongly believe in the KISS principle – Keep It Simple, Stupid! And while sometimes you just can’t get away from complicated, this isn’t one of them.

Adding videos to your S3 account and then displaying them securely on your blog SHOULD be EASY and with my new S3 plugin, it is.

The plugin is designed to connect to the Amazon S3 service and then stream the videos directly to your blog. It’s clever. It uses your Amazon issued secret key to allow the viewing on YOUR site only.

That means people can’t get at the URL to download your videos. (Well maybe they could, but it’s VERY difficult and probably only a programmer could do it. Nothing is absolutely impossible.)

Once you have your Amazon secret key, installing, configuring, and using the plugin takes moments. In fact it takes a few seconds to add a protected video to your site.

At just $10 during this opening sale and including a full client / flipper (developer) licence, it’s worth every penny.

-Frank Haywood


Posted by Frank Haywood in internet business, software, wordpress plugins

Magic Slidebar Plugin

Update: The sale for the Magic Slidebar plugin for WordPress is now live at just $17.00.

Buy now

***

[youtube id=”7C_xdk0xDSg” width=”640″ height=”360″ autoplay=”no” api_params=”&rel=0&showinfo=0″ class=””]

Demo Page

Plugin Great members will already find the plugin in the members area.

It enables you to display simple text, link and image content in a slide-out bar, either automatically or manually with a tab you can tap or click to show or hide the slidebar. It looks just as good on your phone as it does on your desktop computer.

Better still, you can create as many of these content slide-outs as you like and either display (or disable) them globally, and even select which slide-out shows on each individual page and post. That means you can place different content on every page and post, or mix and match with all posts showing one slidebar except for those you choose to display something else.

You can also set the cookie on each slidebar to decide how often it should auto-display itself.

So for example you can set the cookie to 14 days and have the slidebar auto-display itself the first time that someone views a page, but then not again for 14 days. The tab still shows the whole time, so if someone wants to view the content manually, then they can.

This is very useful for displaying important messages to visitors without bugging them too much and driving them away.

o Full developer (client / flipper) licence in this sale only
o Mobile friendly
o Styling options – background, border, colours etc.
o Easily add an optin form
o Multiple slidebars – as many as you need
o Enable/disable slidebars globally
o Enable/disable slidebars by page and post
o Select active slidebar by page and post
o Add simple text, link and image content
o Special fields for optin forms
o Optional auto slide out and close
o Optional individual slidebar cookie


-Frank Haywood

Posted by Frank Haywood in internet business, software, wordpress plugins